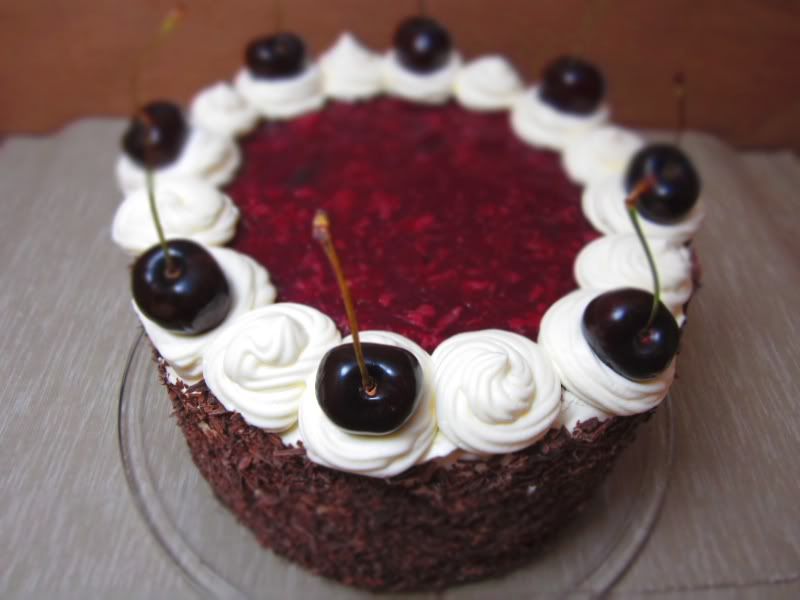
I posted a while back about my first attempt at black forest cake. I was reasonably happy with how it had turned out, but I knew what I would do differently if I made it again. This opportunity came in the form of my very first customer, who, having seen photos of the first cake, wanted me to make one for them.
I wanted to go for a lighter cake this time as the first one was quite dense. I decided to challenge myself and try making a chocolate sponge. For the record, I suck at sponge cakes. They are notoriously difficult for the home baker so I am definitely not alone in this boat. I spent a good amount of time researching recipes and techniques online, and eventually settled for the promising-sounding Moist Chocolate Genoise from Rose Beranbaum’s The Cake Bible.
Genoise (pronunciation) is a very light, dry, and slightly elastic Italian sponge cake. It differs slightly from other sponges in that it contains no chemical leavening, so it relies entirely on air being incorporated into the mixture to rise properly. Other sponges may also use egg whites and yolks separately, whereas a genoise uses the whole egg, often heated with sugar in a bain-marie.
I was rather disheartened when my first pair of genoises came out looking like shriveled cookies. I had sifted the flour 3 times, followed the instructions perfectly, and folded the batter as gently as possible…WHY?! Why was my cake not airy and light like it was supposed to be? But failure was not an option with an expectant customer, so I reluctantly started again.
It went much faster and smoother the second time, and I began to get a feel for how the batter behaves. The second pair of cakes came out so damned perfect I was shocked. They rose all the way to the tops of the pans with a smooth, flat outer crust. It was one of my proudest baking moments. Unfortunately I didn’t have a camera on hand, but I measured them each at just under 5cm tall once cooled (it is normal for genoise to sink slightly whilst cooling).

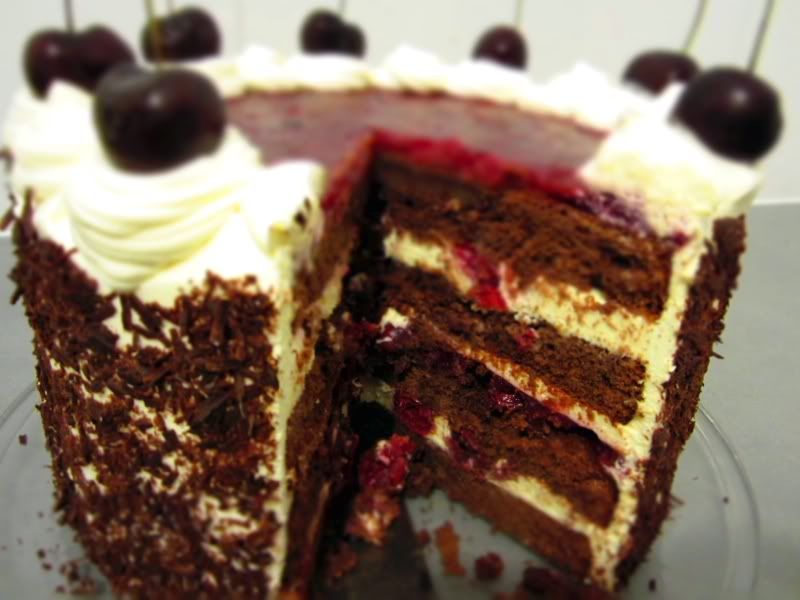
In my previous black forest I had layered it with a thick cherry filling made by cooking sour cherries with sugar and cornflour. I did the same thing but only used it in the middle layer and on top of the cake. For the other two layers I left the cherries whole and uncooked for a fresher flavour. The sponge cake lived up to its name and was quite moist for a genoise, but I still brushed the cake layers with some kirsh syrup to prevent it being too dry.
I spotted some uncharacteristically nice-looking fresh cherries at the supermarket whilst shopping for ingredients and couldn’t resist buying some. Usually you will only see cherries available in Australia for a limited time during summer for abut $20/kg, so this was an unexpected bonus. Forgive the pun, but I think they were the cherry on the cake so to speak, and I’m glad I bought them. They tasted really delicious.
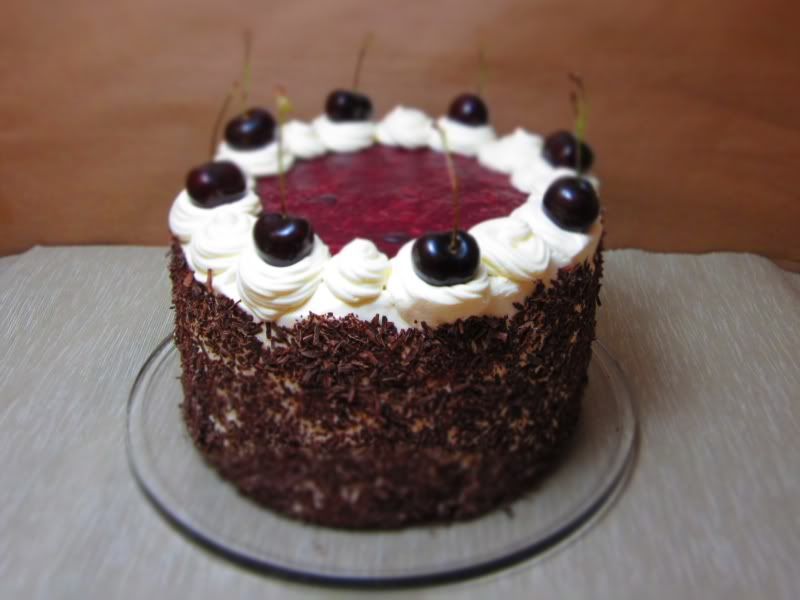
Once the cake was filled and assembled, it was ridiculously, almost laughably tall. You can just imagine how large each slice was. It was quite an impressive sight though I must admit, and the customer was extremely happy with it. They thought it tasted great too which is the most important thing of all.

Moist Chocolate Genoise
Recipe by Rose Levy Beranbaum, author of The Cake Bible. I don’t own the book but after making this cake I intend to. I sourced the recipe from here.
These videos (last two) of Rose baking a different genoise helped me somewhat, so I recommend giving them a look if it’s your first time making this type of cake.
I used 8″ diameter cake tins although the recipe calls for 9″, which is why my cake was so tall. Either would work fine but cooking times will differ slightly. You will need two same-sized tins, or you could halve the recipe and make a smaller cake.
- 230g dark chocolate (cocoa content 60-65% for best results)
- 1 cup water
- 8 eggs
- 1 cup caster sugar
- 1 Tbsp natural vanilla essence
- 1 1/4 cups plain flour (I recommend a low protein cake flour)
- 1/4 cup cornflour
Preheat oven to 180C.
Line the bottoms of two cake tins with baking paper and grease the sides.
In a saucepan, melt the chocolate with the water over low heat, stirring constantly. Simmer for 5-10 minutes, or until the chocolate thickens to a thin-custard consistency. [The first time I did this I cooked the chocolate until it was too thick; when it cooled it was very difficult to fold into the cake batter, so keep this in mind]. Cool to room temperature, stirring occasionally.
Sift the flours. Reserve.
Combine the eggs and sugar in a heatproof bowl and place over a pan of simmering water (aka: bain-marie). Whisk gently whilst the egg mixture warms from the steam below. The sugar should completely dissolve. Take care not to over-heat or you will have scrambled eggs. You should be able to comfortably place a finger in the mixture. When it is quite warm, but not hot, remove from heat. [This process will make the eggs whip up better, but it is not essential if you are using room temperature eggs].
Beat the eggs in a stand mixer with whisk attachment on high speed, until tripled in volume, at least 7-10 minutes. I kept beating mine for closer to 15 minutes. A hand-held mixer may take longer. Don’t cheat on this step as it is the most important part. Also, don’t bang the whisk/beaters on the side of the bowl as this will knock air out of the mixture.
Sift 1/3 of the flour mix over the beaten eggs (as gently as possible), and fold in gently but rapidly until some of the flour has disappeared. Repeat twice with the remaining flour until all the flour has disappeared. Fold in the chocolate mixture until just incorporated.
Pour immediately into prepared pans, and bake at 180C for 30-35 minutes, until a tester inserted in the centre comes out clean or the top springs back when gently pressed. The cake should have shrunk away from the tin slightly, but you may need to loosen the sides with a metal spatula/butter knife, before inverting onto lightly greased cooling racks. Re-invert to cool.
When my cakes were almost cool I wrapped them in clingwrap and placed them in the freezer, which helped to keep them moist. Remember, any steam coming off a cooling cake means it is loosing moisture. Wrapping a hot cake in clingwrap will just make it wet, however.
Kirsch Syrup
- 1/4 cup sugar
- 1/2 cup water
- ~1/4 cup kirsch or cherry liqueur (depending on how boozy you want the cake to be)
Bring the sugar and water to a rolling boil, stirring until the sugar has dissolved. Take off heat, stir in the liqueur if using, cover and allow to cool.
Cherry Filling
If you want to save a step you can substitute cherry jam for the cooked filling, but you will still need one jar of sour cherries.
- 2 x 680g jars pitted sour cherries (one jar is not cooked)
- 1/3 cup cornflour
- 1/2 cup sugar
Drain one jar of cherries and set aside.
Strain the other jar over a bowl to reserve the juice.
Combine cornflour and sugar in a saucepan. Add a little reserved juice and whisk to form a paste. Slowly add the rest of the juice to avoid lumps.
Whisk constantly over medium heat until the flour is cooked. It will rapidly turn clear and thicken up. Add the cherries from one jar and continue whisking until you are happy with the consistency. It is up to you how much you want to break up the cherries. If you leave them whole they may be difficult to spread though.
Cool completely. Re-drain the uncooked cherries if they are weeping liquid (excess moisture may cause the cake to ooze or even collapse).
Whipped Cream Filling
Use this when you need a thick, stabilised cream to support layers of cake or to ensure piping holds it’s shape.
I used double this recipe. One amount for filling the cake, and the other amount for the sides and piping on top.
- 4 tsp gelatin
- 1/4 cup cold water
- 600ml whipping cream with a high fat content (~35% or higher)
- 1/4 cup icing sugar (or to taste)
- 1 Tbsp kirsch (replace with 1 tsp vanilla essence for other uses)
- 1/4 cup boiling water
Pour cold water into a small bowl and sprinkle gelatin over it to soak. Just leave it to soften, no need to stir.
It is important to use a good quality cream with a high fat content so that it forms stiff peaks without curdling and does not ‘weep’ water as thinner creams tend to do. I use Masters Pura Whipping Cream. I have found that Brownes is no good. Organic creams tend to be very suitable also and have more flavour. Combine cream with sugar and kirsch (or whatever flavouring you choose eg. vanilla, mint, coffee…) and whip to soft peaks.
Pour boiling water over soaked gelatin and stir gently until dissolved.
Add gelatin to cream in a thin stream whilst beating and continue until thick and combined.
It can be used straight away or allowed to set slightly. If it does set, simply stir it up gently and it can be used again. It will have a mousse-like texture once completely set.
To assemble the cake:
Trim cake tops if necessary and cut in half.
Moisten cake slices with kirsch syrup using a pastry brush or spoon.
Layer as follows: cake, whipped cream, half of the uncooked cherries, cake, half of the cherry filling, whipped cream, cake, whipped cream, remaining uncooked cherries, cake, and top with remaining cherry filling.
Spread cream on sides of cake and pipe swirls around the top if you wish. Press grated chocolate to the sides using whatever method works for you.
Top with fresh or candied cherries.
 Other Recipes
 Desserts
 Cakes
Cakes Dinner Ideas
That looks really incredible :D I’ve never made a gateaux, looks a little tricky, but amazing!
Thanks. It’s more time consuming than anything. The genoise was definitely the hard part, the rest is super easy. Stabilising the cream with gelatin is one of the best tricks I’ve learnt and it makes assembling the cake a breeze.
[…] all time, but it’s definitely worth a go if you feel up to it. If I did make it again [edit: I did] I would definitely try a chocolate sponge and would possibly use more cream in the layers. If I […]
Beautiful… I would love one thin slice and one of the juicy black cherries (my favorite!) You did well and should be proud of this creation….RaeDi
Thankyou! A thin slice is all one would need from this monster.
Wow this looks amazing and brings back so many memories from childhood. Thanks for sharing. Nothiing like a nice light fluffy sponge to put a smile on ones face :-) Please take a look at our version of a Victoria Sponge http://ahintofgarlic.wordpress.com/2011/10/03/ultimate-victoria-sponge/ we would love to know what you think ?
Yay! Glad to have found this blog. Lovely. I will be back soon.
[…] to reading this blog, of course AFTER I’d made the sponge, I found a video of making a Genoise cake from author Rose […]
Back a hundred years ago, okay in 1989, my mother had given me the Cake Bible for my birthday. I was invited to a big, fancy Christmas party at my bosses home. I made the Black Forest Cake from Rose’s recipe/Cake Bible and it was AMAZING. It was literally inhaled by the guests. After that I had to take cake of some sort to office functions. I was living in a little apartment, didn’t sift over and over and it was fine. I’ve made it since and no problems. I do use cake flour for this cake, but not too pressed to use it in other recipes.
Pretty cake and nice blog.